Satellites
by ted Brattstrom
(thanks Heavens-Above.com)refresh to see current position |
Objects in Low
Earth Orbit (LEO) (thanks
NASA) |
Satellites
by ted Brattstrom
(thanks Heavens-Above.com)refresh to see current position |
Objects in Low
Earth Orbit (LEO) (thanks
NASA) |
Once you get into going out in the evening looking at Stars, Planets, Meteors and the Moon, you may notice that there are other things cruising through the sky other than objects 100,000 kilometers and more away. To turn these “UFO”s into “IFO”s, there are some pretty easy techniques. And then, you can go even farther!At any given time, there are several thousand objects orbiting the earth. These vary in size from baseballs to schoolbus plus. Some are active working satellites, HST and ISS are big and bright, and others are fragments of rockets, or trash thrown out of ISS! There are 100 or so reasonably bright satellites that are visible, though you won’t see them all in one night.
All of these easily visible satellites are Low Earth Orbit satellites (LEO), staying between 150 and 800 kilometers above the Earth’s surface. Orbital mechanics means that they may not be passing overhead where you are during the crucial “satellite hours”.
Satellite hours – If you head outside for the hour or so after sunset, or the hour or so before sunrise, you stand a good chance of seeing a satellite or 5. My best was 10 in an hour and a half. It’s a simple process, go outside and look up! Give yourself time to dark adapt, and enjoy the sky even if you don’t see one! For best results you will need to aim your attention in certain directions, and that is based on typical satellite Orbital Inclination.
Orbital Inclinations – There are three basic pathways used by most of the LEO satellites. These originate in the purpose of the satellite, and the location of the launch. Early American satellites were launched eastward in 23 degree inclination orbits (23� to the equator) from Cape Canaveral, since that was the latitude of launch. Early Soviet satellites were launched eastward at about a 56 degree inclination (56� to the equator), again, the latitude of the launch. Finally, most Earth Resources, Weather, and Spy Satellites were launched in “Polar orbits" of roughly 98�. When put into the proper altitude, this made them “Sun Synchronous” – going over the ground at the same sun angle each time.
What this means for satellite watching is that all satellites are going to be going in one of 4 basic directions*. *Israel has launched a couple of satellites that go from East to West - you are unlikely to see them.
2 – South to North (polar)
thanks daviddarling.info
4 – Northwest to Southeast
thanks Canadian Space Agency
Depending on where you live, compared to the current orbital pass and inclination - you could get a SW to SE, and NW to NE, rarely a W to E.Appearance - Most satellites will look like stars crossing the sky at a steady pace. A few will be tumbling, and so catch the sun in different ways, flashing their way across the sky. Of course, if you see a red flashing light crossing the sky, it is most likely to be an aircraft! If you have binoculars, look for the additional green and white lights. If it is moving towards the west, it is most likely an aircraft also!
Most satellites will be “white” in color – however a few have been seen to have a yellow-orange color. These may be fuel tanks, and there is some discussion that they may also be spy satellites. The ultimate in satellite light comes from the Iridium satellites, when light from the sun reflects and "flares" from one of the solar panels.
Iridium Flashes / Flares – These are lots of fun, but you have to have your watch set accurately. They only last about 15-20 seconds, and can be up to a magnitude -7 if you are in the right place on Earth. The best way to find out about them is using the Heavens-Above website. Enter in your latitude and longitude, or city name, and ask for a weeks worth of Iridium flashes. Go outside a little before the flash is to occur and look in the general direction of the flash. Heavens-Above will give you an azimuth (degrees around from North) and an elevation (degrees up from the horizon). Keep watch!
Some people have seen these during the day, and I’ve seen them through thin cloud cover, as well as seeing a thicker cloud cover brighten!
Advanced Satellite topics:
Prediction Programs and Keplerian Elements - Other than going out and just looking, the easy way to do a serious satellite watch is to make up a set of predictions. You can do it yourself with software, or have the Heavens-Above website do it for you.
To do it yourself, you will need two things, a satellite prediction program, and the latest Keplerian elements. Some of the newer astronomy programs have satellite tracking built in. Starry Night is one example. For the Mac – I’ve used OrbiTrak. It is a little dated (originally system 7! Works in system 8 and 9) and works fine for tracking and predicting. For Win, I’d do a quick check of www.amsat.org and look under their software offerings. Some are free, some are old and DOS, and some are shareware.
Keplerian elements? This is the mathematical set of parameters that give information on the location and movement of the satellites. NORAD knows where the satellites are, and publishes them (or most of them). If you have to manually download them, www.celestrak.com is a great source. They also have a good description of what all the numbers mean. Each piece of tracking software has it’s own method for inputting the data – that’s where reading the manual helps
. Newer software will automatically download / update the elements for you.
SEESAT is the group of people involved in watching satellites. They identify new ones, and try and figure out what is happening up there. Sometimes they figure out new "unannounced" satellites - those that governments may not awknowledge as really being there.
Photographing Satellites - Taking pictures of satellites is a lot like taking pictures of stars and constellations. You need a tripod, a cable release, and a camera that can be set to “B” to leave it’s shutter open as long as you need. Using a high ASA film, 30 seconds to a minute will give nice constellations, with not a lot of star trailing.
Set the camera up on a tripod, aim it towards the area the satellite is going to be passing through. If it is going through a nice constellation, all the better! Set the focus on infinity, the f-stop one down from all the way open, and the shutter speed set to B. The cable release is a useful tool to minimize the shaking given to the cameral when you press the shutter. When the satellite is in the field of view, open the shutter and hold it open for 30-60 seconds. When the film is developed, there should be a nice streak going through where the satellite passed.
Some digital cameras can be set to give a 15 to 30 + second exposure. This is something you will have to read your camera manual on.
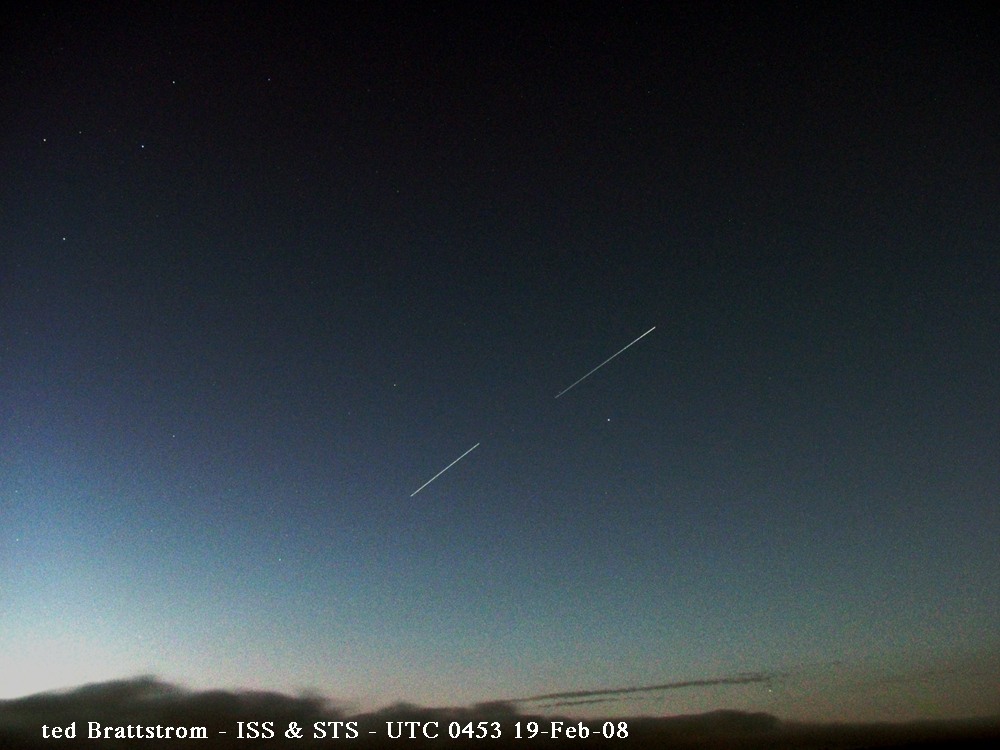
Here is an image I made of ISS and the Shuttle/STS with a 15 second exposure on my FujiFinepix S7000, with a little contrast adjustment afterwards. The shuttle is in the lead to the right, ISS is to the left. Cassiopeia is in the upper left, Polaris is just below the Shuttle. This was taken from the floor of Kilauea Caldera in Hawaii, not too far from my house. (UTC 0453 19-Feb-2008 - HST 1853 18-Feb-2008)
Iridium flashes are shorter in duration and more intense, so the use of digital cameras with a 15 second exposure would be great.
Taking pictures of the night sky takes a little practice, and it isn’t all that difficult to come up with some nice images.
Over the last few years some people have been taking on the challenge of taking images of the larger satellites as they transit the Sun or Moon. There are some nice images of the International Space Station and the Space Shuttle crossing the face of the moon and sun. This requires information on the exact times and positions of the satellites and the Sun/Moon as well as taking a picture through a good telescope with the appropriate filters.
Satellite Observations via Radio - Many of the satellites orbiting the earth carry active radios. With the right equipment, these can be monitored, and with more sophisticated equipment you can even do some science. Some of the easiest ones to hear are the polar orbiting navigation satellites, and many of the amateur radio satellites, including the International Space Station.
A scanner with an outside antenna will allow listening to many of these sources. Tune to 150.000 MHz and periodically you will hear data coming down for 3-10 minutes. If your scanner can tune into the 136-137 MHz band (rare on the cheap ones), you can listen to the polar orbiting weather satellites. There are some simple programs that use the soundcard on your computer to let you display the weather picture in realtime! Amateur Radio satellites are usually heard in the range of 145.800-146.00 MHz, and it is possible to occasionally talk with astronauts on the ISS as it goes overhead.
AMSAT is the group of amateur radio operators that launches and uses satellites.With a more sophisticated radio, you can monitor the Doppler shifting of the satellite as it goes by. From this you can determine the (relative) speed of the satellite!
List of Frequencies - most scanners are FM - so the CW signals won't be heard as more than a carrier. A radio that can monitor SSB/CW and that can be connected to your computer can offer more information about the signal.If you are quite lucky, you can watch the satellite visually, while listening to it on the radio. My best was talking to an American astronaut on Russian Space Station MIR while I was watching it go overhead! WAY Cool!!!
Moving into a more advanced level, some of the amateur satellites downlink a telemetry set that gives information on the health and conditions on the satellite. Some years ago a California high school class was able to determine that one satellite had been rotating on its axis one way, and had stopped, and started spinning the opposite direction!
Geosynchronous Satellite Observing - While most of the GEO satellites are large, they are also a long way away – 30,000km +. This means they are harder to see. Some of the newer computer tracking telescopes from Meade and Celestron will slew to the satellites in the Clarke Belt and let you watch them. The cool thing is that the satellite doesn’t move, and the stars DO move behind them. You should be able to see them in your Dobsonian telescope, if you’ve calculated where they are and aim correctly.
copyright ted Brattstrom / NEO Foundation 2006 - 2008
* ted Brattstrom is a High school science teacher - amateur radio operator - amateur satellite user - former ATS-3 PEACESAT station manager/operator - amateur astronomer of the "enjoy the sky and cool faint fuzzy things" sort... and a few other odd traits... and someone who likes to get people to look up at night, to see the things that are there that they ignore... He is also interested in Meteorites and Impact Craters - what happens if NEOs become EOs.
Updated - 13 Feb 2010
 ....
....